- This article is about the boss. For the painting, see The Destroyer (Painting)
The Destroyer is the Hardmode version of the Eater Of Worlds that was added in the 1.1 update. It has a total of 80,000 health spread over 82 segments (including the head and tail segments) and is made of metal, just like Skeletron Prime's head and hands and The Twins. The Destroyer sends out small flying enemies called Probes that shoot lasers at you. The red lights are probes that have not been sent out yet. As probes are ejected, the lights turn off.

The Destroyer, unlike the Eater of Worlds, does not break apart when individual pieces lose all of their HP. Instead, damage dealt to it will deplete the entire health pool, which means that damaging multiple segments will drain health from it faster. When defeated, loot drops from nearest segment.
The Destroyer sometimes spawns at night during hardmode, with the message "You feel vibrations coming from deep below..." or "You feel a quaking from deep underground..." appearing the previous dusk.
- This can happen if it has not yet been defeated in the current world.
- Otherwise, use Mechanical Worm to summon the boss.
- He is the only source of the Soul of Might.
- He does not despawn if the player attempts to escape too far, like Moon Lord. He will also not teleport to the player, however. Instead, he will move freely in the air in a straight line to reach them (when off-screen).
Tips[]
- Never depend on Debuffs because the boss has total debuff immunity.
- Base level, recommended equipment for this fight is Adamantite Armor or Titanium Armor. At least 2 potions of each kind that increase your stats or help you fight (Ironskin Potion, Thorns Potion, Gravitation Potion, Hunter Potion, Swiftness Potion, Shine Potion, Night Owl Potion) and Greater Healing Potions for recovery.
- It is advised to use weapons that can pierce through multiple targets, such as Holy Arrows, Unholy Arrows, Jester Arrows, Flamethrower (Need to kill Skeletron Prime to make), the Demon Scythe, or just a broadsword or spear. The Flamethrower is effective because it rapidly inflicts high damage and passes through at least 3 segments per shot. The Magical Harp, Cursed Flames and Golden Shower are also effective against this boss.
- The Probes are immune to all debuffs.
- Much like its lesser form, The Destroyer is not very effective when faced with players on platforms. Making platforms with 15 spaces in between each will ensure the boss itself doesn't reach the player or easy to dodge, however, its lasers can still shoot you, and be sure to give yourself plenty of running space, about 80 blocks wide.
- Probes are useful for healing (100% chance of dropping a heart/20% in Expert Mode). If you have good defense and ration these hearts, it is possible to win without using any potions. Sometimes outside of expert they won't 100% drop hearts.
- It is advised to fight the probes and other projectile shooting monsters such as Gastropods as the lasers combined can finish you off from The Destroyer's attack.
- A Nimbus Rod can be used to deal some extra damage while the player attacks the boss with other weapons, but if used correctly, can take the destroyer down all by itself.
- Recommended accessories for this boss are Star Cloak, Philosopher's Stone, Cross Necklace, Cobalt Shield or their upgrades to increase survivability. For more defense, all accessories should be reforged to Warding.
- Inferno Potions work well at destroying the Probes as soon as they come near the player. Note that, in order to get these potions, one will need the Hotline Fishing Hook, or have found some in Shadow Chests in the Underworld.
- It is recommended that you summon the Destroyer as early as you can in the night as it will flee the battle at dawn. You don't need all the time, just a precaution or if your strategy needs a lot of time.
- The Optic Staff is effective against this boss as Spazmamini's attacks will pierce every segment. This will mean defeating The Twins to obtain the materials to make it though.
- Onyx Blaster can be made with little farming, it's dark shard projectile deals area damage. This allows multiple segments to be hit at once, and can also hit the probes if they were hiding behind. Because it's a shotgun and the boss is very large, you are very likely to hit 100% of the time. Pair with Explosive Bullets (which can splash the segments and are easy to make) and it should down the boss in 5-7 minutes.
Strategies[]
Tanking Methods[]
The below strategies require that you have a high defense (50+), which can be achieved with accessories reforge to warding and Adamantite/Titanium Armor. Additionally, you may also use Nimbus Rod with this setup for extra DPS or a Cobalt Shield for no knockback.
- Simply battle him on the ground, melee him and retreat when your health falls to dangerous levels (it'll take a good while though). Auto-swing weapons like the Cutlass, Phasesaber are the best choice with this method.
- The Fetid Baghnakhs is very useful due to it's high attack speed. The short range is not a problem as you will take damage with other melee weapons anyways.
- A flail (ideally, the Dao of Pow) can also be used with this method. Simply use the flail and keep it out, and let the boss run through both you and the flail.
- Death Sickle is also a good choice for this method, as it deals massive DPS against the boss.
- Make a small box and fill it with Spiky Balls and let the boss move through them.
- For this method you will need approximately 50-60 armor and the Crystal Storm spell. Create a tower and just stand inside it for the entire battle.
- The Destroyer will pass through you, and you can use the Crystal Storm to deal immense amounts of damage to him really quickly.
- You will likely be heavily harmed, but the probes will die quite quickly and can be relied upon for healing.
- For this method, at the very least, have a Cross Necklace, a phasesaber and about 40 defense. The rest is optional, but consider having melee speed increasing accessories. Make a small box, then summon the Destroyer.
- Immediately take out your phasesaber and hold down the fire button. With the cross necklace, you are invincible longer, and the phase saber hits multiple parts fast. Healing potions are not needed, as you can simply walk to an edge to kill some probes/collect hearts from fallen probes.
Melee 'Pow!' method[]
For this method, all you need is at least 2 Heart Statues, 1 Meteorite/Hellstone, a few wires, a timer, and a Dao of Pow.
- First, mine one block out from any surface.
- Next, place the Meteorite/Hellstone were you mined that block.
- Then, place down the 2 Heart Statues next to the Meteorite/Hellstone.
- Next, you then mine out another block to set the timer down.
- Connect the timer to the statues with wires.
Finally you just simply grapple onto your fire block and throw down the Dao of Pow and let the Destroyer run through you.
Ranged 'Death From Above' Methods[]
- You'll need: an Adamantite/Titanium Repeater and/or a Clockwork Assault Rifle, a large number of Hellfire Arrows and/or Crystal/Exploding Bullets, and a few Gravitation Potions.
- Start the battle and fly over The Destroyer, firing away with your ranged weapon of choice.
- A long sky bridge built away from your house with a hole to shoot through would also aid with this method.
- You can also use spells with piercing abilities using this method. Magical Harp, Golden Shower and Demon Scythe are considered good choices. Combining them with a Nimbus Rod will increase your DPS. For best effect, aim the spells so they pass through multiple segments of its body.
- Make a giant ceiling just out of its reach, grapple onto it and shoot it with a powerful weapon such as the Star Cannon or the Hallowed Repeater.
- Instead of grappling, you can drink a Gravitation Potion for ease of maneuverability.
- Laser shooting probes will still be able to reach you with this method; have a plan to deal with them.
- Alternatively, use a Rope line for ease of maneuverability. Allow for possible slips by making 'safety' lines further down.
- With this method, a Nimbus Rod is very helpful, as you can build a sky bridge, make a hole, put in platforms, and the rain will go through, and hit him.
- with the bug of the nimbus rod's rain passing through blocks, placing the cloud on the skybridge with autoswing weapons will make it so easy you can just drink a cup of tea while attacking him.
Explosives Method[]
Each individual block of Explosives inflicts about 500-800 damage. About 2-3 groups of explosives should be enough to kill the boss.
- Rig up a wire system with Explosives in several groups and a lever.
- Place the clusters of explosives about 15 blocks apart.
- Activate the trap when The Destroyer is crossing them.
Fireworks Method[]
This method is similar to the Explosives Method, although easier and quite a lot more colorful. Fireworks deal heavy damage to the boss, and because The Destroyer is so long, he should be very easy to hit.
- Buy about 200-300 fireworks from the Party Girl. (any color will do)
- Place all of your fireworks along with a flat piece of land where you wish to fight The Destroyer.
- Summon The Destroyer and let loose all of your fireworks when the boss is above you.
Note: More or less fireworks may be needed depending on how many fireworks hit the boss, but if you do this correctly, the boss goes down relatively quickly and you do not have to use any form of ammunition. Also, the fireworks make the boss kill quite marvelous to look at. Get a backup weapon in case this fails.
Arena Methods[]
- Build a room or an arena out of dungeon bricks, buy as many explosives as possible and throw Grenades, Dynamite or Bombs.
- An arena that has several small rooms can prevent The Destroyer from firing lasers at you, effectively reducing taken damage, however, you must still avoid the rest of The Destroyer's body as well.
- You could make a room for the Nurse at the top to help you with healing. Prepare some coins for this
- Note that a Wyvern could spawn and kill the Nurse. The Destroyer itself can also have the same problem.
- Any weapon that can bounce off the walls multiple times (Water Bolt, Crystal Storm or Cursed Flames) will be useful with this method.
- Another method is to build a 10x10 square of any material, place spiky ball traps across the top, and use wire to connect them to a 5 second timer. This causes a constant stream of spiky balls inside that square. This strategy requires good defense and a good weapon or spell, at least full hallowed armor and a Cutlass or an equivalent weapon. Stand on top of the "Boss Cruncher" and swing your cutlass. This method should dispatch the boss in a minute or so. This strategy is great for farming Souls of Might and Hallowed Bars.
Coil Method[]
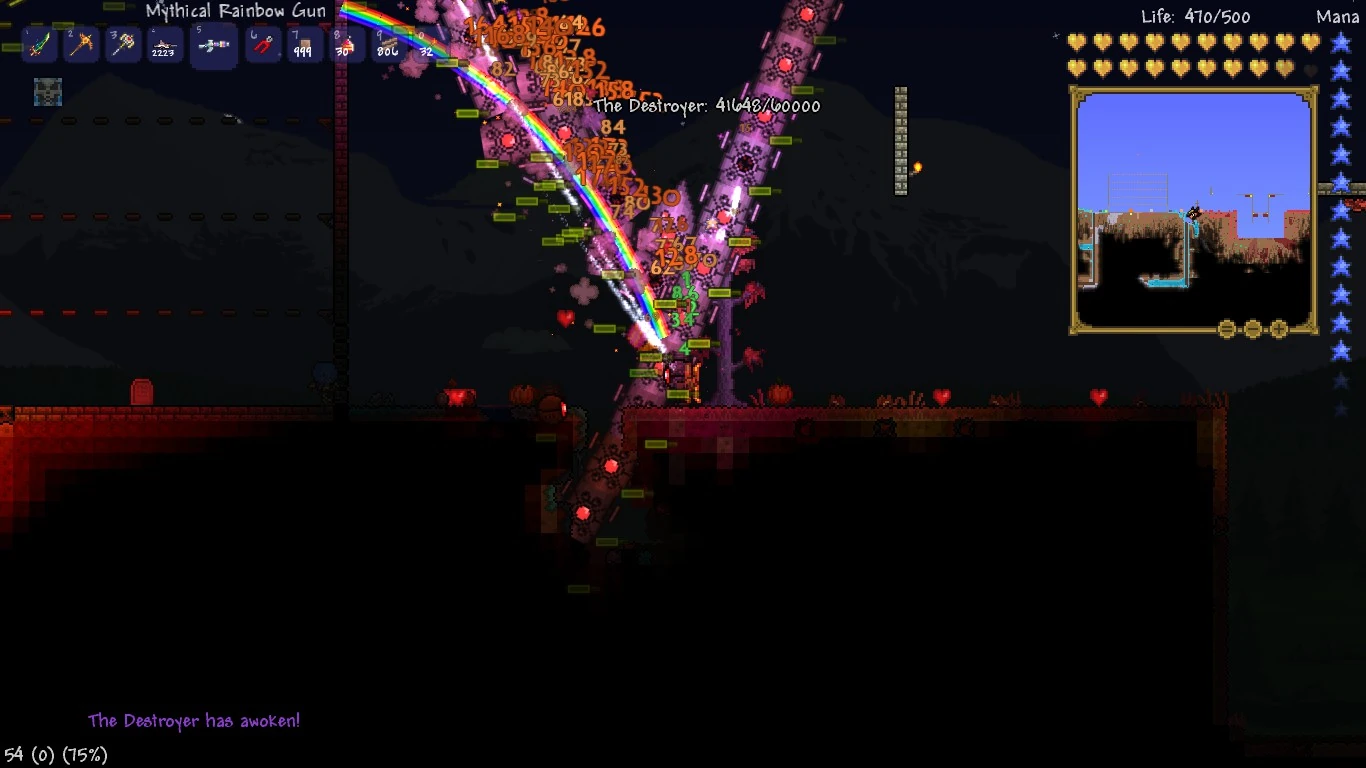
Rainbow Gun against the Destroyer
A method that takes advantage of the Destroyer's unusual spawning tendencies, the coil method is one of the fastest ways to kill the Destroyer in late-game play, when farming for souls and money.
- This strategy takes advantage of the fact that the Destroyer spawns in a single "coil", with half or three-quarters of its body overlapping within a 5-10 block space.
- To begin with, create a thin layer of 10-20 blocks (optional) for the boss to spawn on, positioned a good bit off the ground. The Destroyer tends to spawn on whatever "structure" is closest to the player, but still off-screen, and this will ensure the coil is created above ground.
- Next, position yourself well above the ground. Use any type of Wings to carry yourself up to a platform and summon the boss using a Mechanical Worm. It is recommended for the ground to be well out of your view.
- Finally, fly down to the ground where you created the block layer. If done correctly, you should see the coil of Destroyer parts above ground. Fire at this with a penetrating weapon (Golden Shower, Magical Harp, etc.), and massive damage should ensue. In older 3Ds versions you can also throw a Holy Hand Grenade.
Cannon Method[]
A method used to take advantage of the Destroyer`s body length, with each shot dealing a high amount of damage. This strategy is also in version 1.2 or higher. However, to get the Cannon, you need to have finished the Pirate Invasion event at least once for the Pirate NPC to spawn, as he's the only NPC that sells it.
- This strategy takes advantage of the fact that the Destroyer is really easy to hit.
- First, create 2 or 3 levels of wooden platforms. Then, somewhere near the center on the top level, add a cannon (pointed upwards).
- Then, go to the pirate and buy a lot of cannonballs from him. Also, make sure you have a decent amount of potions and a relatively high defense stat.
- Before summoning the Destroyer with the Mechanical Worm, go to the cannon. Finally, continuously launch cannonballs into the air, and you should easily defeat the Destroyer.
Summoner method[]
This method includes using summoned minions to aid in the boss fight, spiders to be exact since they are the best obtainable minion before killing any of the mechanical bosses.
- First you will need the Spider Staff and a whole set of Spider Armor. The maximum number of minions used with this setup will be 4. The Queen Spider Staff is optional since the damage done by it is underwhelming and since it despawns after time, it will need to be placed again. This can cause distractions which can cost you health. Place background walls in your arena to allow the spiders to roam free and attack Destroyer with greater efficiency, because they climb walls.
- Combining this method with other weapons with high DPS is quite effective.
- If you have defeated the Twins, using an Optic staff helps because of the Piercing damage.
Carpet Bombing Method[]
This method involves the use of a Daedalus Stormbow and Hellfire Arrows. This is one of the easiest and simplest ways to kill The Destroyer.
- Build a simple yet tall arena for The Destroyer.
- After summoning The Destroyer and buffing yourself (optional), bomb The Destroyer with the Daedalus and Hellfire Arrows as ammunition.
No Arena Method[]
This method also will require a Daedalus Stormbow and Holy Arrows. This method allows you to defeat the Destroyer in about 1 minute.
- Simply carpet bomb him the bow and the stars will damage him heavily.
- For best results, wear full Titanium Armor, though, Adamantite or Orichalcum are acceptable.
Knife Rain Method[]
This method works best on a Sky bridge made out of Wood Platforms or similar blocks.
- Weapons needed: Magic Dagger, Nimbus Rod
- Armor Needed: At least Orichalcum Armor
- Potions Recommended:
- Hunter Potion/Night Owl Potion/Shine Potion - will make seeing the Probes less of a problem
- Thorns Potion - The Destroyer and its probes will take damage when they touch the player
- Magic Power Potion - Increases the damage dealt by both the Magic Dagger and the Nimbus Rod
- Mana Regeneration Potion - Increases mana regeneration rate
- Swiftness Potion - Makes avoiding the Destroyer easier
- Regeneration Potion - Increases survivability
- Lifeforce Potion - Increases max life
- Ironskin Potion - Greatly increases survivability
- Greater Healing Potion - A few of these should prevent early death
- Greater Mana Potion - Allows for a more steady stream of Magic Dagger projectiles
- Equipment needed:
- Lightning Boots - Increased movement speed and super fast running
- Sorcerer Emblem - Increased damage from Magic Dagger and Nimbus Rod
- Wings/Jetpack - Enhanced aerial movement
- Ankh Shield - More defense than Obsidian Shield
- Mana Flower - Decreases mana usage and allows for automatic use of the Greater Mana Potions
- Also:
- Heart Statues, Star Statues and Campfires can help out
- Activate the statues using 1 Second Timers.
- Use the potions (except Greater Healing/Mana).
- Summon the Destroyer using a Mechanical Worm.
- Cast the Nimbus Rod twice in separate locations, but close enough that you can see them both on-screen.
- Attack the Probes with the Magic Dagger.
Note: This strategy, if done properly, can defeat the boss in under a minute.
Box Strategy[]
This strategy relies on the Destroyer not being able to reach the player. The way it works is that the player must build a box high above ground where the Destroyer cannot reach them, leave some gaps, and use whatever weapons they have at their disposal.
This is one of the easiest methods of defeating The Destroyer, though it is recommended that the player be wary of Probes as they can fly.
Notes[]
- Each segment of The Destroyer contains a red orb. If they receive too much cumulative damage, Probes pop out and the red orbs are turned off. It is necessary to kill these enemies as laser damage is very high.
- Probes do not return to the boss.
- When The Destroyer spawns, it has all of its segments clustered together, similar to other worm enemies. If the player can locate this cluster, they can deal massive damage in seconds with weapons like the Nimbus Rod and Daedalus Stormbow combined.
- None of the boss' ranged attacks pass through walls.
- If The Destroyer is still alive at sunrise it will despawn. Thus, speed is the key of the battle - There's only a maximum of 9 minutes to fight him.
- If The Destroyer is defeated in multiplayer and the server lags, it may cause The Destroyer's head to remain present, and it will continue burrowing and trying to attack the players.
- The Destroyer can be considered the easiest Hard Mode boss. The reason for this is that all that is needed is sound preparation; dexterous maneuvering and even general survivability are not necessarily required.
- The Destroyer has the highest total health of any one mob in the game, due to the fact that although every segment can take individual damage whittling down the main health pool, it never breaks apart unlike Eater of Worlds.
- The Destroyer can spawn naturally at the beginning of any night in Hard Mode. Before it spawns, the message, "You feel vibrations coming from deep below." will shortly be followed by "The Destroyer has awoken!". However, you will have to smash an altar after defeating WOF, otherwise, Mechanical bosses can't spawn.
- If the player is unlucky, The Destroyer will spawn very early after defeating the Wall of Flesh. Meaning the player is extremely unprepared. It will continue to spawn with a 10% chance if it's never been defeated in the world before. Quitting the world when the message displays or going too deep underground will prevent it from spawning. Otherwise, it spawns after 81 seconds.
- The Destroyer is one of the only two bosses that never despawns if you go too far, the other being Moon Lord.
- The highest possible DPS against the Destroyer can be achieved using a Rainbow Gun (preferably reforged to "Mythical") along with damage-boosting accessories (Sorcerer Emblem, Avenger Emblem, Destroyer Emblem, etc.) reforged to "Menacing" or "Lucky".
- The Last Prism with a Demonic Modifier and Accessories can do even better because it hits much faster (12 times per second) and deals more damage even in a single hit.
- The Destroyer is the first Mechanical Boss to have "minions"
- Aside from its inspiration from the Eater of Worlds, it also shares very similar minions and the same boss theme with the Brain of Cthulhu. This can be considered a combination of the Eater of Worlds and Brain of Cthulhu, as it is a worm with segments and can deploy floating minions.
- A Heat Ray can kill it in 3 seconds. Not in expert mode due to it's absurd defense.
Bugs[]
- If the Destroyer is summoned when the player is on a Floating Island and the player jumps off, the Destroyer's body will be stuck in one place in the air.
- A bug causes the Destroyer's head to get detached from the body if more than two are spawned at a time.
- Sometimes, The Destroyer will inexplicably get stuck for a short time.
 There is a very rare chance that when you summon The Destroyer, it's sprite will turn into that of the EOW or becomes invisible.
- Rarely, when defeating The Destroyer, the game will say "The Jungle Grows Restless" signifying Plantera can be fought but The Destroyer won't drop loot.
- On the mobile version, if you fight The Destroyer near the edge of the world and his head goes out of the world, the head will be replaced with the nearest mob. The Destroyer's body will follow the "head" and after a little while, the Destroyer will be defeated with no death message or drops.
Trivia[]
- The Destroyer is very long, measuring 82 segments in total length, whist Eater of Worlds is about 56 segments long.
Update Info[]
- Health increased to 80,000.
- All body parts have 20 more damage.
- Body and tail defense are increased by 4/5 respectively.
- Drops now appear at the segment closest to the player instead of the head.
- Now drops the Destroyer Mask.
- Added immunity to all Debuffs.
- No longer spawns during Pumpkin Moon.
- Hallowed Bars added to its drop table.
- Health decreased from 80,000 to 60,000.
- Now drops the Destroyer Trophy.
- Can now spawn randomly at night during Hard Mode.
- Added to the game.